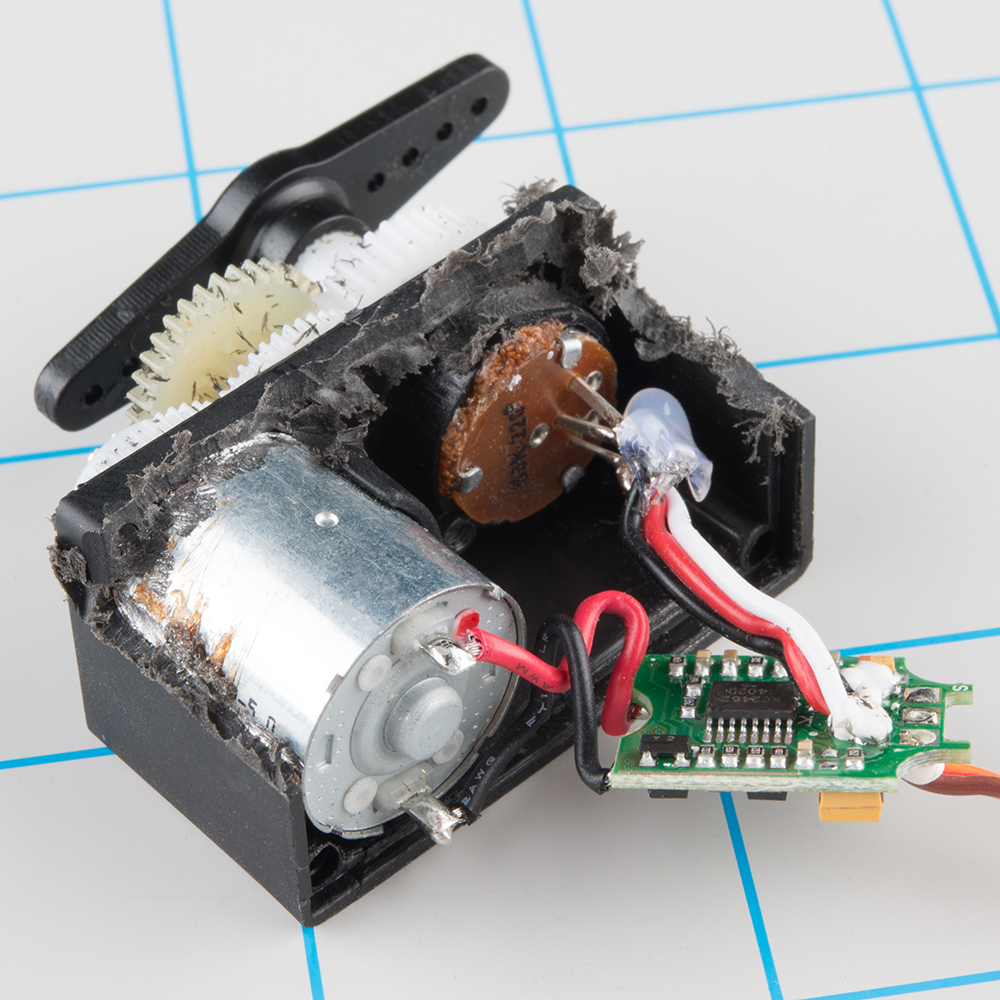
The servo motor (also known as "hobby servo" or "RC servo") rotates to specific positions.
When you need to rotate or move to specific positions within a finite range (typically 180°). Note that there are many types of servos of varying size and quality; use a larger servo or one labeled as having metal gears inside if you need to move a lot of weight.
There are also continuous rotation servos, which are hooked up the same way but move continuously in either direction at varying speeds instead of moving to a specific angle.
The servo motor consists of a motor, gearbox, controller, and potentiometer in one convenient package. The Arduino sends the servo timed pulses of electricity (called Pulse Width Modulation or PWM). The time between each pulse tells the controller in the servo what angle to rotate to.

The servo controller knows what angle it is at with the potentiometer built into the servo. Because of the potentiometer, the servo has a limited range of motion but is very accurate at moving to exact positions.

There are a few common color schemes for servo wires. The black or brown wire is GND and the red wire is VCC at 5v. The yellow, white, or orange wire is the position signal, which is connected to a digital pin. The Arduino can't always supply enough power to the servos, so it is best to use the Breadboard Power Supply to power servos.
When the servo is receiving a signal from the Arduino, it is constantly trying to go to the requested position as quickly as possible (and hold at that position). If an outside force pushes it to another position, it will jump back. If you hear a stuttering or whining from the servo motor, then the weight of the object being rotated may be too much for it to handle. This wears out the servo motor very quickly and usually means you need a more powerful one.
Note that while servoes may technically be able to go between 0° and 180°, they sometimes can't quite hit either extreme.

/*
 * This program sets up a servo motor on SERVO_PIN and
 * moves it back and forth between two positions.
 *
 * Initially by Robert Zacharias from https://courses.ideate.cmu.edu/60-223/f2020/tutorials/servo
 * Modified 2021-04-23 by Perry Naseck
 */

#include <Servo.h>

// Digital pin for the signal pin of the servo
const int SERVO_PIN = 3;

// Setup the servo motor
Servo myMotor;

void setup() {
  // Set myMotor to use the servo on SERVO_PIN
  myMotor.attach(SERVO_PIN);
}

void loop() {
  // Tell the servo to go to 10 degrees
  myMotor.write(10);

  // Pause for 500ms
  delay(500);

  // Tell the servo to go to 170 degrees
  myMotor.write(170);

  // Pause for 800ms
  delay(800);
}